
This article describes how to resize the OS volume on a running EC2 instance which is based on the Linux 2 AMI. This pertains to the Amazon AWS cloud.
If you’ve arrived at this page, you may have the following questions:
- How do I resize the volume on a running EC2 instance?
- How do I resize a volume on a Linux 2 AMI while it’s running?
To follow this guide, you will need the following:
- Access to modify volumes within the AWS Console.
- SSH connection (through something like PuTTY) to the instance.
AWS Console: Resize the Volume
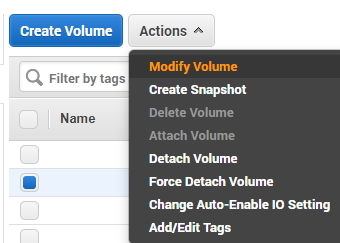
- Log into the AWS console and go to the Volumes tab.
- With the volume selected, you can select Actions > Modify Volume.
- Set the new desired volume size and press Modify.
Expanding usable space within the instance
To follow these next steps you will need to SSH to the instance. This also assumes you are sudoing as the root user. If not you can do that by using the sudo command like this:
sudo suFind the name of the disk
> df - h
Filesystem      Size  Used Avail Use% Mounted on
devtmpfs        979M     0  979M   0% /dev
tmpfs           996M     0  996M   0% /dev/shm
tmpfs           996M  488K  996M   1% /run
tmpfs           996M     0  996M   0% /sys/fs/cgroup
/dev/xvda1      8.0G  1.4G  6.7G  17% /
You can use this output to identify the volume you have resized. In our case, we have one disk with a size of 8 GB and we plan to resize it to 20 GB. The name of the disk is /dev/xvda1.
Expand the usable space
First use growpart on the partition.
> growpart /dev/xvda 1
CHANGED: partition=1 start=4096 old: size=16773087 end=16777183 new: size=41938911,end=41943007
And then xfs_growfs to expand the file system.
> xfs_growfs /dev/xvda1
meta-data=/dev/xvda1 isize=512 agcount=4, agsize=524159 blks = sectsz=512 attr=2, projid32bit=1 = crc=1 finobt=1 spinodes=0 data = bsize=4096 blocks=2096635, imaxpct=25 = sunit=0 swidth=0 blks naming =version 2 bsize=4096 ascii-ci=0 ftype=1 log =internal bsize=4096 blocks=2560, version=2 = sectsz=512 sunit=0 blks, lazy-count=1 realtime =none extsz=4096 blocks=0, rtextents=0 data blocks changed from 2096635 to 5242363
At which point you can now run df -h again to confirm that the volume size has increased. In our case we now see:
/dev/xvda1 20G 1.4G 19G 7% /Troubleshooting
If you attempt to use the resize2fs command instead of xfs_growfs you may get the following error:
resize2fs 1.42.9 (28-Dec-2013)
resize2fs: Bad magic number in super-block while trying to open /dev/xvda1